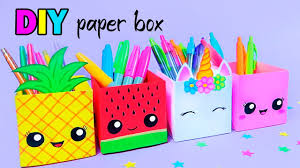
How to Make a DIY Pen Stand ideas | Easy Craft Idea

Are you tired of searching for DIY pen stand and pencils all over your desk? Let’s fix that with a fun and easy DIY pen stand craft! Whether you want to organize your study table, add some color to your workspace, or simply enjoy a creative weekend activity, this project is perfect for all ages.
🎨 What You’ll Need
Before we start, gather these simple materials — most of them are already lying around your home!
Materials:
- 1 empty tissue roll or cardboard tube
- Colorful paper or old magazine pages
- Scissors
- Glue or double-sided tape
- Decorative items (stickers, buttons, ribbons, washi tape, etc.)
- A piece of cardboard (for the base)
- Markers or paints (optional)
🪄 Step-by-Step Instructions
Step 1: Prepare the Base
Cut out a small circular or square piece of cardboard — slightly larger than the tissue roll. This will be the base of your pen stand.
Step 2: Cover the Tube
Wrap the cardboard tube with colorful paper or magazine pages. Use glue or double-sided tape to secure it neatly. You can also paint the tube for a more artistic touch.
Step 3: Decorate!
Now comes the fun part — decorate your pen stand however you like! Add ribbons, stickers, buttons, or even hand-drawn doodles to make it uniquely yours.
Step 4: Attach the Tube to the Base
Apply glue around the bottom edge of the tube and stick it firmly to the cardboard base. Let it dry completely.
Step 5: Organize Your Stationery
Once dry, fill your beautiful new pen stand with pens, pencils, scissors, and markers. Your desk just got a stylish upgrade!
💡 Creative Variations
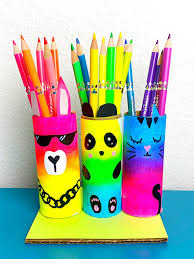
- Recycled Tin Can Version: Instead of a cardboard roll, use an old tin can (make sure there are no sharp edges). Decorate it with jute rope or fabric scraps.
- Multi-Holder Design: Glue two or three rolls together for a multi-section pen stand.
- Themed Pen Stand: Match your stand to your room’s theme — minimalist, floral, cartoon, or even galaxy-inspired!
🌿 Why You’ll Love This DIY Craft
✅ Eco-friendly – You’re reusing waste materials.
✅ Budget-friendly – No need to buy fancy organizers.
✅ Customizable – Make it match your personality!
✅ Great for kids and adults alike.
📸 Pro Tip
Once you finish your pen stand, take some photos and share them on social media! Tag your creations with #DIYPenStand — you might just inspire others to try it too.
🏁 Final ThoughtsHow to Make a DIY Pen Stand at Home | Easy Craft Idea
Are you tired of searching for your pens and pencils all over your desk? Let’s fix that with a fun and easy DIY pen stand craft! Whether you want to organize your study table, add some color to your workspace, or simply enjoy a creative weekend activity, this project is perfect for all ages.
🎨 What You’ll Need
Before we start, gather these simple materials — most of them are already lying around your home!
Materials:
- 1 empty tissue roll or cardboard tube
- Colorful paper or old magazine pages
- Scissors
- Glue or double-sided tape
- Decorative items (stickers, buttons, ribbons, washi tape, etc.)
- A piece of cardboard (for the base)
- Markers or paints (optional)
🪄 Step-by-Step Instructions
Step 1: Prepare the Base
Cut out a small circular or square piece of cardboard — slightly larger than the tissue roll. This will be the base of your pen stand.
Step 2: Cover the Tube
Wrap the cardboard tube with colorful paper or magazine pages. Use glue or double-sided tape to secure it neatly. You can also paint the tube for a more artistic touch.
Step 3: Decorate!
Now comes the fun part — decorate your pen stand however you like! Add ribbons, stickers, buttons, or even hand-drawn doodles to make it uniquely yours.
Step 4: Attach the Tube to the Base
Apply glue around the bottom edge of the tube and stick it firmly to the cardboard base. Let it dry completely.
Step 5: Organize Your Stationery
Once dry, fill your beautiful new pen stand with pens, pencils, scissors, and markers. Your desk just got a stylish upgrade!
💡 Creative Variations
- Recycled Tin Can Version: Instead of a cardboard roll, use an old tin can (make sure there are no sharp edges). Decorate it with jute rope or fabric scraps.
- Multi-Holder Design: Glue two or three rolls together for a multi-section pen stand.
- Themed Pen Stand: Match your stand to your room’s theme — minimalist, floral, cartoon, or even galaxy-inspired!
🌿 Why You’ll Love This DIY Craft
✅ Eco-friendly – You’re reusing waste materials.
✅ Budget-friendly – No need to buy fancy organizers.
✅ Customizable – Make it match your personality!
✅ Great for kids and adults alike.
📸 Pro Tip
Once you finish your pen stand, take some photos and share them on social media! Tag your creations with #DIYPenStand — you might just inspire others to try it too.
🏁 Final ThoughtsvvvvHow to Make a DIY Pen Stand at Home | Easy Craft Idea
Are you tired of searching for your pens and pencils all over your desk? Let’s fix that with a fun and easy DIY pen stand craft! Whether you want to organize your study table, add some color to your workspace, or simply enjoy a creative weekend activity, this project is perfect for all ages.
🎨 What You’ll Need
Before we start, gather these simple materials — most of them are already lying around your home!
Materials:
- 1 empty tissue roll or cardboard tube
- Colorful paper or old magazine pages
- Scissors
- Glue or double-sided tape
- Decorative items (stickers, buttons, ribbons, washi tape, etc.)
- A piece of cardboard (for the base)
- Markers or paints (optional)
🪄 Step-by-Step Instructions
Step 1: Prepare the Base
Cut out a small circular or square piece of cardboard — slightly larger than the tissue roll. This will be the base of your pen stand.
Step 2: Cover the Tube
Wrap the cardboard tube with colorful paper or magazine pages. Use glue or double-sided tape to secure it neatly. You can also paint the tube for a more artistic touch.
Step 3: Decorate!
Now comes the fun part — decorate your pen stand however you like! Add ribbons, stickers, buttons, or even hand-drawn doodles to make it uniquely yours.
Step 4: Attach the Tube to the Base
Apply glue around the bottom edge of the tube and stick it firmly to the cardboard base. Let it dry completely.
Step 5: Organize Your Stationery
Once dry, fill your beautiful new pen stand with pens, pencils, scissors, and markers. Your desk just got a stylish upgrade!
💡 Creative Variations
- Recycled Tin Can Version: Instead of a cardboard roll, use an old tin can (make sure there are no sharp edges). Decorate it with jute rope or fabric scraps.
- Multi-Holder Design: Glue two or three rolls together for a multi-section pen stand.
- Themed Pen Stand: Match your stand to your room’s theme — minimalist, floral, cartoon, or even galaxy-inspired!
🌿 Why You’ll Love This DIY Craft
✅ Eco-friendly – You’re reusing waste materials.
✅ Budget-friendly – No need to buy fancy organizers.
✅ Customizable – Make it match your personality!
✅ Great for kids and adults alike.
📸 Pro Tip
Once you finish your pen stand, take some photos and share them on social media! Tag your creations with #DIYPenStand — you might just inspire others to try it too.
🏁 Final ThoughtsHow to Make a DIY Pen Stand at Home | Easy Craft Idea
Are you tired of searching for your pens and pencils all over your desk? Let’s fix that with a fun and easy DIY pen stand craft! Whether you want to organize your study table, add some color to your workspace, or simply enjoy a creative weekend activity, this project is perfect for all ages.
🎨 What You’ll Need
Before we start, gather these simple materials — most of them are already lying around your home!
Materials:
- 1 empty tissue roll or cardboard tube
- Colorful paper or old magazine pages
- Scissors
- Glue or double-sided tape
- Decorative items (stickers, buttons, ribbons, washi tape, etc.)
- A piece of cardboard (for the base)
- Markers or paints (optional)
🪄 Step-by-Step Instructions
Step 1: Prepare the Base
Cut out a small circular or square piece of cardboard — slightly larger than the tissue roll. This will be the base of your pen stand.
Step 2: Cover the Tube
Wrap the cardboard tube with colorful paper or magazine pages. Use glue or double-sided tape to secure it neatly. You can also paint the tube for a more artistic touch.
Step 3: Decorate!
Now comes the fun part — decorate your pen stand however you like! Add ribbons, stickers, buttons, or even hand-drawn doodles to make it uniquely yours.
Step 4: Attach the Tube to the Base
Apply glue around the bottom edge of the tube and stick it firmly to the cardboard base. Let it dry completely.
Step 5: Organize Your Stationery
Once dry, fill your beautiful new pen stand with pens, pencils, scissors, and markers. Your desk just got a stylish upgrade!
💡 Creative Variations
- Recycled Tin Can Version: Instead of a cardboard roll, use an old tin can (make sure there are no sharp edges). Decorate it with jute rope or fabric scraps.
- Multi-Holder Design: Glue two or three rolls together for a multi-section pen stand.
- Themed Pen Stand: Match your stand to your room’s theme — minimalist, floral, cartoon, or even galaxy-inspired!
🌿 Why You’ll Love This DIY Craft
✅ Eco-friendly – You’re reusing waste materials.
✅ Budget-friendly – No need to buy fancy organizers.
✅ Customizable – Make it match your personality!
✅ Great for kids and adults alike.
📸 Pro Tip
Once you finish your pen stand, take some photos and share them on social media! Tag your creations with #DIYPenStand — you might just inspire others to try it too.
🏁 Final ThoughtsAre you tired of searching for your pens and pencils all over your desk? Let’s fix that with a fun and easy DIY pen stand craft! Whether you want to organize your study table, add some color to your workspace, or simply enjoy a creative weekend activity, this project is perfect for all ages.
🎨 What You’ll Need
Before we start, gather these simple materials — most of them are already lying around your home!
Materials:
- 1 empty tissue roll or cardboard tube
- Colorful paper or old magazine pages
- Scissors
- Glue or double-sided tape
- Decorative items (stickers, buttons, ribbons, washi tape, etc.)
- A piece of cardboard (for the base)
- Markers or paints (optional)
🪄 Step-by-Step Instructions
Step 1: Prepare the Base
Cut out a small circular or square piece of cardboard — slightly larger than the tissue roll. This will be the base of your pen stand.
Step 2: Cover the Tube
Wrap the cardboard tube with colorful paper or magazine pages. Use glue or double-sided tape to secure it neatly. You can also paint the tube for a more artistic touch.
Step 3: Decorate!
Now comes the fun part — decorate your pen stand however you like! Add ribbons, stickers, buttons, or even hand-drawn doodles to make it uniquely yours.
Step 4: Attach the Tube to the Base
Apply glue around the bottom edge of the tube and stick it firmly to the cardboard base. Let it dry completely.
Step 5: Organize Your Stationery
Once dry, fill your beautiful new pen stand with pens, pencils, scissors, and markers. Your desk just got a stylish upgrade!
💡 Creative Variations
- Recycled Tin Can Version: Instead of a cardboard roll, use an old tin can (make sure there are no sharp edges). Decorate it with jute rope or fabric scraps.
- Multi-Holder Design: Glue two or three rolls together for a multi-section pen stand.
- Themed Pen Stand: Match your stand to your room’s theme — minimalist, floral, cartoon, or even galaxy-inspired!
🌿 Why You’ll Love This DIY Craft
✅ Eco-friendly – You’re reusing waste materials.
✅ Budget-friendly – No need to buy fancy organizers.
✅ Customizable – Make it match your personality!
✅ Great for kids and adults alike.
📸 Pro Tip
Once you finish your pen stand, take some photos and share them on social media! Tag your creations with #DIYPenStand — you might just inspire others to try
Read also: Handmade Paper Swag Glasses – Fun, Funky & Totally Handmade!


Post Comment